If you already have services with us, you're just a few steps away from unlocking all the features and tools of your online portal. Let's get you set up!
What You’ll Need Before You Start
To register, make sure you have:
- Your (Company Name) Customer Number (found on your invoice).
- The email address tied to your account’s main contact.
Who Can Register?
You don’t need to be the service account owner to create an online profile. However, the person who completes the registration will become the primary user of the portal account. This role includes full access to billing details, payment options, service management, and other sensitive information. The primary user will also have the authority to make changes to the account or cancel services.
How to Register – Step by Step
1. Create Your Online Profile
- Click the “Create Your Online Account” button.
- A registration form will pop up—fill it out with:
- First Name
- Last Name
- Email Address (must match one on your (Company Name) account)
- Mobile Number
- Your Customer Number
- Check the box to accept our Privacy Policy.
- Click “Register”.
2. Set Your Password & Finish Up
- After registering, you’ll get an email with a link to create your password.
- A temporary password will be created—this needs to be changed before you can log in.
- Click “Continue” on the confirmation screen in the portal.
- Follow the email instructions to finish setting your password and activate your account.
That’s it—you’re in!
Once logged in, you’ll have full access to your service information, self care, and more.
Need help? Contact our support team at (123-456-7890)
Get all the details on how and when you're billed for your service. Learn about payment methods, due dates, and more.
Just set up your online account—or log in if you already have one—to get started!
There are three easy ways to pay your bill (Yes, It’s That Simple!)
- Online
Skip the line and pay anytime! Just go to MY ACCOUNT, click the Make a Payment button, and follow the steps using your favorite method—Credit/Debit Card, E-Check, or even PayPal and Venmo. - In Person
Love a friendly face? Drop by one of our locations to pay your bill in person. We’ll be happy to help! [Insert link or list of locations] - By Mail
Prefer the old-school route? No problem. Just drop your bill stub and check in the mail and send it to:
[Insert mailing address]
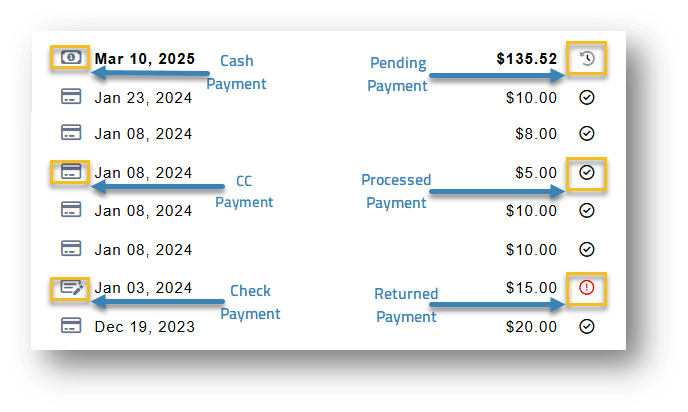
Yes! You can see all your past payments in your payment history. Go to the “Payment History” section to see what’s been paid, when and how. There are easy to understand icons that provide more details about each payment:
Definitely! You can set up recurring payments so your bill gets paid automatically each month—no need to worry about due dates or late fees. Go to MY ACCOUNT and click on “Manage Autopay” in the menu on the left, and follow the steps to get started.
It's, quick, easy, and one less thing to think about!
Yes, you can! Just go to MY ACCOUNT and click on “Manage Digital Wallet” in the menu on the left and follow the instructions. It’s secure and saves you time.
Your monthly bill includes a detailed summary of your services, charges, and payments. It also displays your Customer Number, Statement Number, and the mailing address for sending payments.
Account Summary
- Billing Period: The dates for which you are being billed.
- Previous Balance: Amount carried over from your last bill, if any.
- Payments Received: Payments applied since your last bill.
- Total Amount Due: The amount you need to pay by the due date to avoid late fees.
Current Charges
- Service Charges: Monthly charges for your active services (e.g., Internet, Phone, TV).
- Equipment Fees: Charges for leased equipment such as modems or cable boxes.
- Usage-Based Charges: Any overage fees or pay-per-use services, such as international calls.
- Promotions & Discounts: Applied discounts or promotional pricing.
- Taxes & Fees: Government-mandated taxes and regulatory fees.
Payment Details
- Your chosen payment method and any automatic payments scheduled.
- Information on how to update or change your payment preferences.
How to Get Help
- If you notice a charge you don’t recognize or have any questions, our support team is here to help.
- [Contact Us] or visit the [Billing FAQ] page for more answers.
Absolutely! You can easily check out your detailed monthly bill and download a copy whenever you need it. Just go to the “Bill History” section in MY ACCOUNT. You’ll see up to a year of past invoices, including the date and amount for each one.
To view, download, or print your bills:
- Find the invoice you want and click the chevron (the little > arrow) next to the amount.
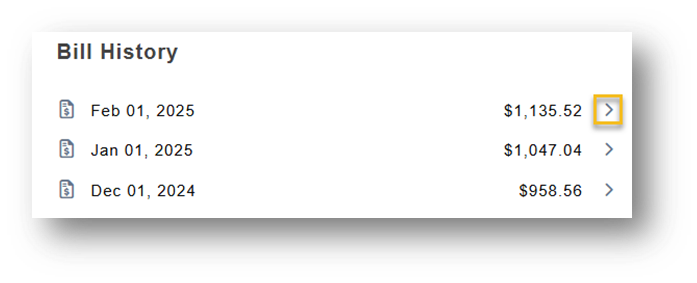
2. A PDF of the bill will pop up—then you can view it, save it, or print it from there.
Manage your account effortlessly—update your contact information, adjust billing preferences, and keep everything current, all in one convenient place.
Just set up your online account—or log in if you already have one—to get started!
Every service you subscribe to is listed as a Service Account. These accounts let you see what’s active, how it’s set up, and more!
Viewing Your Services
From the My Account page, you can view the services tied to the Statement you’re currently working with.
Only services linked to the selected Statement are shown.
Need to view services from another Statement? Just use the drop-down menu next to My Account to switch.
To view your services:
- Click on Services in the left-hand menu.
- You’ll see a list of all Service Accounts related to the selected Statement.
What You’ll See in the Services List
Each service shows key info at a glance:
- Account Type: Represented by a helpful icon
- ID: This changes depending on the type of service—like a username for Internet or a phone number for Phone.
- Service Account Number: A unique number that identifies the service
- Account Status: Tells you if the service is Active, Disconnected, or Temporarily Suspended.
- Disconnect Reason: If applicable, you’ll see why a service is disconnected or paused.
Disconnected Services:
If you’ve had any services permanently disconnected, you’ll see a toggle switch on your services page.
Simply turn the toggle on to view details about those disconnected services, and turn it off to hide them.
You’ve clicked Details from the dropdown! Now you can see all the key info about this specific service account, all in one convenient place.
Service Details Overview
This section gives you a quick snapshot of your service:
- Account Type – What kind of service are we talking about? (Internet, Voice, etc.)
- ID – Right next to the Account Type. This format changes depending on the service—for example, a username for Internet or a phone number for Voice.
- Start Date – When this service account officially
- Service Account Number – The unique number for this service.
- Account Status – Tells you whether the account is currently Active, Disconnected, or Temporarily Suspended
Recently Billed Charges
Here’s where you can see what was charged on your most recent statement:
- Charge Description – What the charge was for.
- Charge Amount – How much it was, including tax.
Want to see the pre-tax amount? Click the little chevron (∨) to expand the details.
- Total as of… – The full total billed (with tax) and the date of your latest statement.
Let's start the process of making changes to your account ? To default information, please sign in
Misspelled Name: To correct the misspelling of the first and/or last name on your account, please enter and submit your info in the Name Change form here.
Legal Name Change: For account changes related to a legal name change (marriage, divorce, or other legal decree) please click here.
Click here to transfer ownership of your account.
Moving? Click here to start that process.
Customer Links lets Primary Users who have more than one Customer Account in our billing system view them under one login. This makes it easy to switch between accounts and see statements or other details—all from one secure sign-in.
Note: Customer Links only lets you view and access multiple accounts. It does not create new users or logins.
Note: This option will only appear if you are a Primary User.
How to Access Customer Links
Go to My Account
Click Customer Links (left menu)
What You Can Do
Add more Customer Accounts to your login
View all accounts currently linked to your login
Linking Another Customer Account
To link another account to your login:
Enter the Customer Number you want to add.
Note: You must already know the Customer Number—there is no search or lookup feature.
Click Submit.
What Happens Next?
Depending on the email address on the account you entered:
If the Main Contact email matches your own:
The account is linked automatically and will appear in your list.If the Main Contact email is different:
The account is added as Pending. The Main Contact for that account will receive an email asking them to approve or deny the request.Once approved, the account will automatically appear under your Linked Accounts.
Note: If the account you link is already associated with another portal login, that access will remain. A link will also appear under Customer Links for transparency.
Viewing Linked Account Statements
To view statements for your linked accounts:
Go to My Account.
Open the Statement dropdown.
Select the statement for any of your linked accounts.
To help keep your account secure and ensure you receive important updates, we may occasionally ask you to confirm your contact information.
When needed, a confirmation form will automatically appear after you log in. This form displays the current information we have on file and allows you to review or update it.
Why are we asking?
So your account details stay current and we can contact you if needed.
What You’ll See on the Contact Confirmation Form
Contact Count (if applicable): Shows how many customer accounts are linked to your login as a Primary User.
Main Contact Details: Includes your name, email, phone number, and any additional information based on your portal setup.
Mobile Number Requirement (if enabled): If required, you must enter or confirm a mobile number before continuing.
Remind Me Later: Delays the confirmation. The form will appear again after the set reminder period.
Confirm: Confirms that your information is correct. The form won’t appear again until the next scheduled verification timeframe.
The form will continue to appear until you click Confirm.
What Happens After You Confirm?
Any updated information you provide will automatically sync with our Billing System, ensuring your Main Contact details are accurate and consistent across your account.
The Internet Broadband Label is like a nutrition label for your internet service — designed to give you a clear, easy-to-read summary of what’s included in your plan.
It helps you understand the key details of your service — from pricing and speeds to data limits and any additional fees — so you can make informed decisions and compare plans with confidence.
Here’s what you’ll typically find on the label:
- Monthly Price – Includes any promotional pricing and what you’ll pay after that period ends.
- Download & Upload Speeds – Typical speeds to expect for streaming, browsing, and more.
- Data Allowance – Whether your plan includes unlimited data or has a monthly limit.
- Additional Fees – Such as equipment rental or early termination charges.
- Network Management Policies – Any practices like throttling or data prioritization that may affect your service.
This label is part of our commitment to transparency — helping you know exactly what you're getting, with no surprises.
Easily update your mailing address and choose how you receive your statements—by mail or electronically—to keep your account accurate and organized.
If you’re receiving paper statements and need to change the address they’re mailed to, you can easily update your billing address with just a few clicks!
Here’s how:
- Look for the Statement box at the top of the page.
- Click the pencil icon — that’s your edit button.
- A pop-up window will appear where you can enter your new Billing/Mailing Address.
- Enter the new address and click save
Heads up!
This only updates the Billing Address for where your statement is sent. It won’t change the Service Address tied to your account.
Prefer a cleaner inbox over a full mailbox? With paperless billing, you can choose to stop receiving printed statements and access everything digitally—convenient and environmentally friendly.
To opt in for paperless billing:
Click the “Go Paperless” button located next to the Mailbox icon.
If your account meets the requirements, you’ll see a confirmation message: “Thank you for going paperless!” A confirmation email will also be sent to the main contact, and your paper statements will stop starting with the next billing cycle.
Updating Your “My Account” Login Credentials
- Need to change your password? No problem!
- In the black Profile box, click the pencil icon to edit your profile.
- In the left menu, select Change Password.
- Enter your current password and your new password in the fields provided.
- Be sure to follow the password requirements shown below the fields.
- Click Update Password.
You’ll receive a confirmation message once your password is successfully updated.
Viewing Your Billing System Security Code
- Your Billing Security Code is a 4-digit code used by our Customer Service team to verify your account when needed.
- This code cannot be changed here and is only visible to Primary and Authorized Users.
- To view the code: Click the eye icon next to the Billing Security field.
If you have the proper access, the code will be revealed.
Need to give someone else access to your online account? No problem! Main and Authorized Users can invite others to create their own login credentials—perfect for sharing account access with a partner, roommate, or family member.
Here’s how to add a new user:
- Go to the My Account page.
- Select Authorized Users from the menu.
- Click Add Authorized User
- Enter the name and email address of the person you’d like to invite.
- Select their access permissions and click Save
They’ll receive an email letting them know they’ve been invited by you. Once they accept and create their login, they’ll have access based on the permissions you’ve set.
You’re always in control—only Main and Authorized Users can manage access and permissions.
help with techy stuff